Tuesday, July 30, 2013

Kaisercraft True Romance Collection Card

 Hi,  I hope you like my simple but I feel elegant Kaisercraft True Romance Card.  I started off with Kaisercraft card stock, I used the Kaisercraft Doily Stencil which I placed on the cardstock. I then used Tim Holtz Distress Ink pad and blending tool, in a swirling motion all over the Kaisercraft Doily template. I was very happy with the result!

I then teamed it with the die cuts from the Kaisercraft true romance collection ie the butterflies, and the Love title.  The flower border on the side of the card is from the 6 x 6 Kaisercraft paper stack.
I feel the whole Kaisercraft True Romance Collection is so versatile for any projects you have in mind. The flowers are also Kaisercraft.
The lace I used on the card is a bo bunny lace.  All these supplies can be purchased on Kerry's Crafty Cards and Cuts.  Thank you Paula

Monday, July 29, 2013

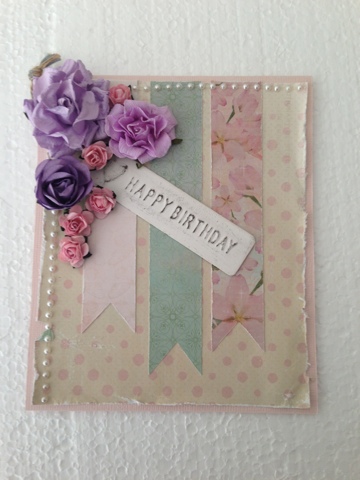
Kaisercraft Enchanted Garden Birthday Card


I am in love with this card!!! I spent half the night awake designing it. As it turns out I didn't have the pink Kaisercraft flowers I thought I had but the purple ones work just as well. 

I have a 12x12 page planned using these beautiful Kaisercraft Enchanted Gardens papers also and can't wait to get started on it to show you all. 

Materials used for this card:

Kaisercraft Enchanted Garden paper collection

Kaisercraft card stock in Ballet

Kaisercraft paper flowers in assorted colours

Kaisercraft Pearls

Metal Tag I found at my local post office. 

Hope you all enjoy as much as I do :)

Kate 

Saturday, July 27, 2013

More Sweet Pea inspiration

Alanna here to share a quick card with you using this month's Sweet Pea collection from Kaisercraft.


 I used the paper pad, sticker sheet and 4x6 journaling pieces on the paper "nifty". I teamed it all with Scarlet cardstock.


Thanks for stopping by.

Monday, July 22, 2013

12 X 12 Kaisercraft True Romance Collection

I really love the Kaisercraft True Romance Collection.  I started by using the 6 by 6 Kaisercraft paper pad and mounted my  photo on this paper.  I then inked around the edges of the matting paper. I used a distressing tool around the 12 x 12 Kaisercraft paper. 
 The finished product. This page will be going into close friends 50th birthday present for her sister.
The Title was done using the Kaisercraft True Romance Sticker Sheet.  I love how the individual words are one sticker.  The small flowers are Kaisercraft flowers.  The bird cage is part of the Kaisercraft True Romance Collection.  The butterflies are made from coloured burlap.


 The embellishments are from the Kaisercraft True Romance Collection. These are so versatile, that they can be used for pages, cards and off the page creations.
I love the Kaisercraft Doily that I used to finish off the corner of my layout.
All of these supplies can be purchased from http://kerryscraftycardsandcuts.com.au/store/.
I hope you enjoy the Kaisercraft True Romance Collection as much as I have.  Paula.

Saturday, July 20, 2013

Sweet Pea Wall Art

Hey everyone, it's Alanna here today. Sorry it's been a bit quiet on the blog front this month - we're all had some unexpected things pop up in our lives over the last couple of weeks. But I'm here today to share a beyond the page project I started a week ago, and finally finished today. Rushing to get it up on the blog (the glue hasn't even dried yet!) so I can go have a nap before my night shift tonight!

As some of you might know from the facebook page, Kerry and I went over to Geelong, Victoria, for Kaisercraft's annual retailers day. While there, we got to shop in the warehouse. And by shop, I mean, I walked around picking things off the shelves and convincing Kerry to get them for me ;) These BTP 3D wall arts were one of them - I got them in butterfly, heart, and today's project - bird. I can't beleive how easy this was to make - don't let the fact it took me a week to get it done fool you...


I used this month's Sweet Pea collection from Kaisercraft - papers (dandy and sassy), sticker sheet and collectables. I also used KaiserColour paint (pale beige) and a pearl (latte) for the birds eye. And I inked the edges with Tim Holtz antique linen distress ink.


I cut a quote from the sticker sheet in thirds and also added a subtle heart that blends in perfectly with the background paper. I raised both of these up on foam tape. For those of you who don't like using stickers (like me) I have two little tips for you. One, is what I do more often than not - adhere foam tape to the sticker and then you can play around with positioning a lot easier. The second tip is from Melissa Kennedy herself - talcalm powder on the sticker and it looses its stick.


All the flowers and leaves in this bottom corner are from the collectables pack. Again, I raised a couple up with foam tape. Love adding dimension, especially to beyond the page projects!


And that's it. Thanks for stopping by the blog today :)

Thursday, July 4, 2013

Sweet Pea Card Tutorial

Hi everyone, it's Alanna here today to share with you a card I made with the new Sweet Pea collection from Kaisercraft (available here in Kerry's store). I've put together a little tutorial as well for you.

First of all... the card we will be making:

 Please note, the finished card is 4 1/4" x 5 1/2" in size.

And now for the tutorial:

Supplies
  • 2 pieces of cardstock - 5 1/2" x 8 1/2"
  • Papers of your choice (I've used the Sweet Pea paper pad)
  • Paper cutter and scoring tool (I've used the score blade that came with my trimmer)
  • Adhesive
  • Coordinating embellishments/stamps/etc to decorate your card
Optional
  • Bone folder
  • Craft knife and ruler
  • Ink for edges


Step One - Making the Card Base

Score the first piece of cardstock at 4 1/4" and fold in half. On the side that is the front, cut a window, 1” from all 4 sides.


Step Two - Making the Lever Insert

Score the second piece of cardstock at 4 1/4" and 6 3/8”. Go in 2 1/8” from the left edge and score down to 1” from the top and up to 1” from the bottom.


To cut the “lever” that will fit through the card front “window”, go in 1” from the left edge and cut a slit that starts 1” from the top and goes down to 1” from the bottom.

Cut from the top and bottom ends of that slit over to the 2 1/8” score line. This produces the “lever” that will fit through the front window.
 
 Fold on all score lines. Folds should be valley/mountain/valley folded.


Step Three - Putting them Together
 
Add adhesive to the “backside” of the left and right panels of the cardstock you just scored and glue it inside the card. The “lever” tucks inside of the front “window”. If this is a tight fit, trim a sliver off the top and bottom of the lever so that it will move freely through the window.


Step Four - Decorating and Embellishing
 
Front of the card -
Cut a 4” x 5 1/4” piece of patterned paper. Cut in 3/4” from all 4 sides to allow for the window. Ink edges if you wish and adhere to the front of your card.
 

Inside of the card -
Cut three strips of patterned paper 1 7/8" x 5 1/4".
Cut two small pieces 1 7/8" x 3/4".
Cut one long strip 7/8" x 3 3/8"

Ink and adhere two of the thin strips to the right hand panels on in the inside of the card.
 

Take the 3rd thin strip, cut in 1” from the right side, 3/4” from the top and 3/4” from the bottom. Cut vertically between those two cuts to make a C shaped piece for the left hand panel of your card. Ink and adhere.

Adhere smaller pieces as shown in picture below to remaining panel.
 

Front panel -
Cut a rectangle 3 3/8" x 2" to fit on front panel. I used a different paper to what I was using for the fronts and insides of the card.


Decorate remainder of card as desired.


Thanks for stopping by today! I would love to see your creations from this tutorial so please post on the facebook page, or in the comment section of this blog post.

PS. This tutorial was adapted from one on SplitCoastStampers which you can find here, along with a video by Laura Lipe.
 

Related Posts Plugin for WordPress, Blogger...